Opened my microwave the other day and - yuck! Here's a trick from Pinterest that I learned and used successfully (without using chemicals).
Mix 1/4 cup white vinegar and 1 cup water in a microwaveable bowl (without top). Cook on high for about 10 minutes and then immediately wipe down interior of microwave with a cloth or paper towel.
Amazing and easy.
What NOT to wear on Christmas
Really?
This post cracked me up and I have to post the best (or worst?) picture of what NOT to wear at Christmas.

This post cracked me up and I have to post the best (or worst?) picture of what NOT to wear at Christmas.
Juicing
I have a Jack LaLanne juicer and it's been resting in a lower kitchen cabinet for a few months. I've been feeling sluggish lately, not feeling like I'm looking my best, so I pulled it out this morning and made a fresh fruit juice.

Fresh juice is packed with nutrients that one's body instantly absorbs. As juice sits, it loses it's nutrients, which is partly why store-bought juice is usually just liquid sugar minus the healthy stuff. Andrew Weil, M.D. has a really quick explanation about whether or not juicing is good. I know that after a juice, I feel energized and more alive.
Today's juice consisted of:
1 peeled lime
1 peeled tangering
1 peeled orange (all citrus fruits need to be peeled)
3 apples

Juicing at home is recognized as a very healthy habit; however, there are some things to remember. 100% fruit juice (like I made this morning because it's all that I had in the fridge) contains A LOT of sugar. A fruit and veggie mix is a good choice, and they taste really good. Amazon.com sells many good juicing recipe books, many of which list the specific health benefits each juice provides (energy, detox, skin health, etc.). Certain juices also combat illness.
I'm going to try one juice a day. And add in more veggies!
iPad Case
I had the pleasure of spending the day with a young friend while his mom was at work. My friend loves Thomas the Train and his iPad. While he dozed during a midday nap, I snagged his iPad and tried out a carrying case project which was inspired by I'm Working on a Project (shown below). The iPad arrived in just a plastic bag, so a secure and padded case is needed for the trip home.

The above was inspired by the tutorial at Amy's Creative Side, and with my next iPad case I will probably follow Amy's directions (she pictures the step-by-step). I measured my friend's iPad and created rough patterns then did some sewing similar to how I made my stockings. The completed case (mine, shown below) is a bit tight so next time I know to add in a bit more allowance on the edges. Also, I almost had a craft fail when I realized I had sewn the lining and outside pieces together (so I didn't have to do binding) but then, the outsides weren't sewn together. That required one more seam, which I think makes my finished project a bit tight.


The above was inspired by the tutorial at Amy's Creative Side, and with my next iPad case I will probably follow Amy's directions (she pictures the step-by-step). I measured my friend's iPad and created rough patterns then did some sewing similar to how I made my stockings. The completed case (mine, shown below) is a bit tight so next time I know to add in a bit more allowance on the edges. Also, I almost had a craft fail when I realized I had sewn the lining and outside pieces together (so I didn't have to do binding) but then, the outsides weren't sewn together. That required one more seam, which I think makes my finished project a bit tight.


Handwriting Clutch

For Christmas, I decided to put together an organizer for my sweet nice who is starting to write. She is a left-handed writer and it seems to be giving her some trouble as many utensils are most easily used by right-handed writers. I found two "swan neck" pens on Amazon as well as a lefty's notebook (It opens from the right hand side instead of the left). In this pack, I also included a handwriting workbook and some tall crayons.


Since this is my first frayed flower, I can see where I'll improve next time but I still think I did an okay job with it. I used fabric that I had in the inside of the clutch. I also secured a button in the middle thanks to The Purl Bee's button tutorial.

And, it does dress up the front of the clutch, I think.

Pen Rolls
I've really been using up the crayon/marker roll idea. I really think it's a great little gift for anyone who has (or, like me, collects) pens, pencils, markers, or crayons. Slide the utensils in, roll it up, velcro shut and it's quick organization inside a bag or purse.

For a lady who I volunteer with, I made six pen rolls. She is planning on giving one to each of her children's teachers. (One being a man, for whom she requested a "manly roll".)
 When planning the pen rolls, I decided to make each for holding six pens. When figuring measurements for the initial cutting of the rectangle pieces, I found that vertical 7.5 inches x 7 horizontal inches worked best to fit highlighters, pens, and mechanical pencils. Each utensil should get 1 inch of space in the roll.

I used the Pleated Poppy's crayon roll tutorial when I first made this project. One can use velcro, snaps, buttons, elastic hair ties, etc. for the closure. I prefer the heavy duty iron-on fabric because I think that it will hold up for a really long time.

For a lady who I volunteer with, I made six pen rolls. She is planning on giving one to each of her children's teachers. (One being a man, for whom she requested a "manly roll".)


I used the Pleated Poppy's crayon roll tutorial when I first made this project. One can use velcro, snaps, buttons, elastic hair ties, etc. for the closure. I prefer the heavy duty iron-on fabric because I think that it will hold up for a really long time.
Simple Stockings
In the Washington Post a few weeks ago, I read a letter written by a mother who was very worried about her daughter. Her daughter's classmates spread the word that Santa was make believe. The daughter decided to believer her classmates, and the mother didn't know what to do. The advice columnist said that the solution was simple and logical. The truth is, the columnist responded, "...Santa only brings you something if you believe in him."
In order to prepare my husband, the two dogs, roommate, and myself for Santa's visit (because we still believe), we need stockings. After working on the Stockings for Soldiers project (for which a very kind fellow blogger sent me LOTS of fabric - thank you!) I found that stockings were fun and simple. I chose a very easy tutorial to follow which allows the stockings to be turned inside out without any seams showing.
I have only made one so far - the stocking is for my yellow lab, Maddie. I like it, and I will post the others once I complete each one.
 |
| This is my dog, Maddie |
 |
| And this is her new stocking made with Pooches and Pick-ups fabric |
Open-fingered Sweater Mittens
I've been walking the dog without mittens and the chilly morning air is getting to be a bit much. So, I've finally tried The Gunny Sack's Fingerless Gloves tutorial so I'm ready for the walk tomorrow morning.

My sweater gloves are rough, but they will work. I followed the Gunny Sack's directions, and it was a quick and painless project.

To start, I just cut off the sleeves of an old sweater. This one wasn't 100% wool, or else I could have felted it, which is recommended for any resweatering craft. Felting a sweater will shrink the sweater and help the material's threads stay together better.


Sew around the thumbs, zig zag (and with color-coordinating thread, not bright white like mine). And then, sew down the sleeve curving in to make the mittens tighter on your arm. Then, sew around the ends to keep the material from unraveling and then you'll have your own sweater mittens!


My sweater gloves are rough, but they will work. I followed the Gunny Sack's directions, and it was a quick and painless project.

To start, I just cut off the sleeves of an old sweater. This one wasn't 100% wool, or else I could have felted it, which is recommended for any resweatering craft. Felting a sweater will shrink the sweater and help the material's threads stay together better.

Just have to try on the sleeves to see where a small cut needs to be made, for the thumb.

Sew around the thumbs, zig zag (and with color-coordinating thread, not bright white like mine). And then, sew down the sleeve curving in to make the mittens tighter on your arm. Then, sew around the ends to keep the material from unraveling and then you'll have your own sweater mittens!

Coloring Pack
I have a cute niece who loves to color, so I wanted to make her something for Christmas that would hold all of her coloring supplies - crayons, pencil, coloring book. This little girl and her parents travel quite a bit and I thought that a case, of sorts, would be easy to put into a bag, into the backseat, etc. Inspired (and feeling confident) after making many marker rolls, I expanded upon that idea with Dilly Baby's Marker Wallet as inspiration.

Here's mine. I see a few places where I will do things differently, next time, but I'm happy with the result. I like Dilly Baby's "tightness" within the pack. I think I might have added too many inches to mine. Again, I'll reconsider that and some other things next time.

During cutting of fabric, I cut the larger pieces at 24 inches by 13 inches. Then, mapped out where I wanted the crayons and the coloring book. I had enough space to add a little space for a pencil to the right of the coloring book.

I wish that I wouldn't have had such a wide space between the crayon tops and the coloring book, but on the other hand, the full space allows the coloring book to be opened up on top of it. So, it's almost like this can be a portable coloring desk...

It folds up and then is closed securely with velcro. In the end it looks kind of like a little binder or Trapper Keeper for crayons and markers.


For the front, I cut out an M for the name of my niece and stitched it on. The stitching shows in the inside too, which I think is nice.

I hope she likes it!
Thrifty Nifty Christmas
Being it's the first year that my husband and I have had our own home (on land - we did own and live aboard a boat previously), I'm extremely excited to decorate (simply) for Christmas. I come from a family who did Christmas BIG and I absolutely love the meaning of the holiday. My wonderful aunt ordered and sent me a wreath which hangs on our front door. I was so happy that my husband took care of the hanging before I arrived home from work. Shows that the Christmas spirit actually does exist in him!
 I put some twinkle lights around the little tree, and this is where my thriftiness started. In one of the off-aisles at Target, the mini-lights are only $3 a box. Very good!
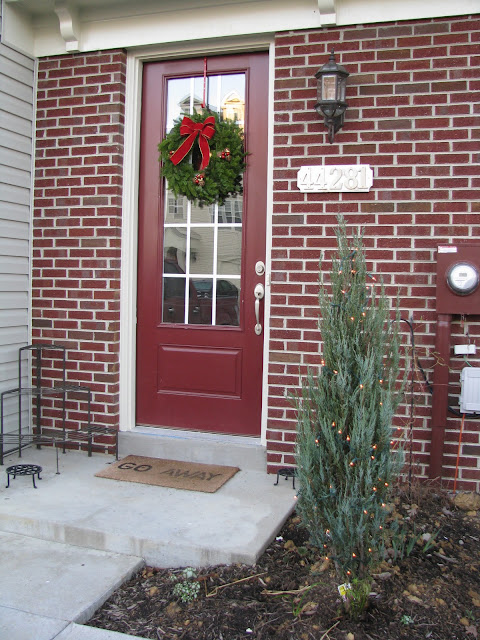 To the left of the doorway, I have space for some decorations but will see what I can find at the Goodwill this weekend. I am looking for lanterns, a sleigh, and I'm trying to gather enough pinecones to fill my spring flowerpots. Those might be all that I do.
Inside, I put up the $20 imitation tree (also from Target) and decorated it with two of the $3 mini light strings and blue bulbs that I found at the Dollar Store. I am looking for a good idea for the tree topper - an angel or star, maybe. I'd like to make something myself. The tree skirt/blanket is a quilt that my friend, Leslie, made for me a few years ago. It's actually teacher fabric, but it will work until I find the time to make my own skirt with holiday fabric. My obligated winter crafts list is long right now....


Inside, I put up the $20 imitation tree (also from Target) and decorated it with two of the $3 mini light strings and blue bulbs that I found at the Dollar Store. I am looking for a good idea for the tree topper - an angel or star, maybe. I'd like to make something myself. The tree skirt/blanket is a quilt that my friend, Leslie, made for me a few years ago. It's actually teacher fabric, but it will work until I find the time to make my own skirt with holiday fabric. My obligated winter crafts list is long right now....

Subscribe to:
Posts (Atom)